Golf carts are a staple in many communities, serving as convenient and eco-friendly modes of transportation. However, like any vehicle, golf carts rely heavily on their batteries for optimal performance. Maintaining top-notch battery health is key to avoiding frustrating breakdowns and ensuring a smooth, enjoyable ride. This article delves into the crucial process of how to test your golf cart batteries, empowering you to diagnose potential issues and ensure they’re operating at their peak.
Read also: How Fast Can a Golf Cart Go?
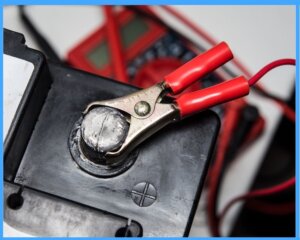
How to test golf cart battery charger
Testing a golf cart battery charger involves a few simple steps using a multimeter, a readily available tool for most DIY enthusiasts. Remember, safety first! Dealing with electricity requires caution, so ensure you’re comfortable working with it before proceeding.
Here’s how to test your golf cart battery charger:
1. Basic visual inspection:
- Start by checking the charger for any physical damage, such as cracked casing, burnt wires, or loose connections. Look for corrosion around the terminals as well.
2. Battery voltage check:
-
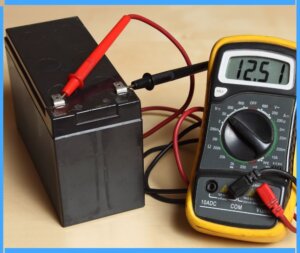
voltage check Before testing the charger itself, measure the voltage of each battery in your golf cart. A fully charged battery should read around 12.7 volts. If any battery falls significantly below this, it might be the culprit behind your charging issues, not the charger.
3. Testing the charger output:
-
Now, it’s time to test the charger’s output voltage. Set your multimeter to DC volts and connect the black probe to the negative terminal of the charger and the red probe to the positive terminal.
-
Turn on the charger and observe the reading on the multimeter. A properly functioning charger should output around 15-18 volts at the initial stage, gradually increasing to around 25-28 volts as the batteries charge. If the voltage reading is significantly lower or doesn’t increase as expected, there might be an issue with the charger.
4. Checking for proper amperage:
-
Once you’ve confirmed the voltage output is within range, you can check the amperage draw of the charger. Switch your multimeter to DC amps and carefully connect the probes in series with the positive battery cable (red probe to cable, black probe to battery terminal).
-
The amperage draw will vary depending on the charger’s rating and the battery’s charge level. Generally, a 12-volt charger will draw around 5-10 amps during the initial charging stage, tapering down as the batteries reach full charge.
Additional checks:
- If the voltage and amperage readings seem off, you can further diagnose the problem by checking the charger’s internal components like fuses, diodes, and transformers. However, unless you’re comfortable with electronics repair, it’s best to consult a qualified technician for this step.
Remember, these are just basic tests to get you started. If you’re unsure about any of the steps or encounter any unusual readings, it’s always best to seek professional help to avoid further damage to your charger or batteries.
Here are some additional tips for maintaining your golf cart battery charger:
- Store the charger in a cool, dry place.
- Keep the charger’s vents clean and free of debris.
- Avoid overloading the charger by charging multiple batteries at once.
- Disconnect the charger from the AC outlet when not in use.
By following these simple tips and performing regular tests, you can help ensure your golf cart battery charger stays in top condition and keeps your cart running smoothly.
Read also: How Much To Rent a Golf Cart {2024}
How do I know if my golf cart battery is bad?
if your golf cart battery is bad involves observing its performance and conducting some simple checks. Here are some signs to watch out for:
Performance issues:
- Reduced range: Your cart can’t travel as far on a single charge as it used to.
- Slow acceleration: The cart takes longer to pick up speed.
- Sluggish performance: The cart feels sluggish and lacks power, especially uphill.
- Frequent charging: You need to charge the batteries more often than usual.
- Uneven voltage readings: Individual batteries within the set show significantly different voltage levels.
Visual inspection:
- Physical damage: Look for cracks, bulges, or leaks on the battery casing. These can indicate internal damage.
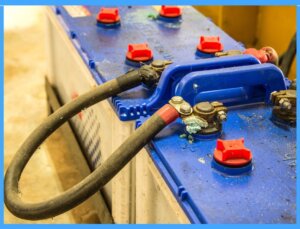
- Corrosion: Excessive corrosion around the terminals can hinder proper charging and performance.
- Low electrolyte level: If the electrolyte level (fluid covering the plates) is below the indicator mark, it could be due to overcharging or evaporation and needs topping up (with distilled water only).
Voltage testing:
- Resting voltage: A fully charged battery should read around 12.7 volts for 12-volt batteries or 6.3 volts for 6-volt batteries. Anything significantly lower may indicate a bad battery.
- Load test: Use a battery load tester to simulate the demand placed on the battery during operation. A significant voltage drop under load suggests a weak battery.
Additional factors:
- Age: Golf cart batteries typically last 4-8 years, depending on usage and maintenance. If your batteries are nearing the end of their lifespan, they may be nearing failure.
- Extreme temperatures: Operating in very hot or cold climates can stress the batteries and shorten their lifespan.
If you observe several of these signs, it’s likely that your golf cart battery is bad and needs replacement. Remember, early detection and replacement can prevent further damage to your cart’s electrical system.
Here are some additional tips:
- Keep a log of your battery’s performance and maintenance, including charging times and voltage readings. This can help you track its health and predict potential issues.
- Invest in a quality battery maintainer to keep your batteries topped off and prevent sulfation buildup during periods of inactivity.
- Choose the right replacement battery for your cart based on its voltage and amp-hour rating.
By following these tips and paying attention to your battery’s health, you can ensure your golf cart runs smoothly and reliably for years to come.
Why Testing Golf Cart Batteries Matters
Understanding the significance of testing golf cart batteries is the first step toward maintaining a reliable and efficient vehicle. We’ll delve into the impact of battery performance on the functionality of golf carts and highlight common problems arising from battery issues.
Signs of Failing Golf Cart Batteries.
Your golf cart’s batteries are the heart and soul of its operation, so keeping them in good shape is crucial. But how do you know when it’s time to say goodbye to your trusty power source and invest in new ones? Here are some telltale signs your golf cart batteries are on their way out:
Performance Issues:
- Sluggish Acceleration: If your cart feels like it’s taking forever to get up to speed, especially on slight inclines, it’s likely due to weak batteries struggling to deliver enough power.
- Range Reduction: Notice you’re having to recharge much more frequently than usual. This could indicate the batteries aren’t holding their charge as well as they used to.
- Hills Become Mountains: Small hills that were once easily traversed now seem like impassable obstacles. This is a classic sign of declining battery power.
Charging Problems:
- Extended Charging Time: Even with a good charger, your batteries are taking significantly longer than usual to charge fully. This points to internal issues affecting their ability to store power.
- Uneven Charging: If some batteries seem to charge faster or slower than others, it suggests an imbalance within the system, potentially due to a failing battery.
Visual Cues:
- Corrosion: Corroded battery terminals or cables can hinder proper charging and indicate internal damage.
- Bulging or Cracking: Batteries shouldn’t bulge or crack. These deformities are a safety hazard and signal imminent failure.
- Leaks: Leakage of any kind, especially acid, is a serious red flag. Stop using the cart immediately and get the batteries checked by a professional.
Other Indicators:
- Age: If your batteries are nearing or have exceeded their recommended lifespan (typically 4-5 years), consider replacing them even if you haven’t noticed any other issues.
- Sudden Power Loss: Your cart simply conking out with no warning is a strong indication of complete battery failure.
Remember: Ignoring these signs can lead to further damage to your cart and potential safety hazards. If you suspect your batteries are failing, get them checked by a qualified technician or invest in new ones for reliable and enjoyable rides.
I hope this helps! Let me know if you have any other questions about golf cart batteries.
Understanding Golf Cart Battery Types
Not all batteries are created equal. We’ll explore the different types of batteries used in golf carts, discussing the pros and cons of each to help you make informed decisions about maintenance and replacements.
When to Test Your Golf Cart Batteries
It’s wise to be proactive with your golf cart batteries and not wait for obvious signs of failure to test them. Here are some key scenarios where testing your batteries is a good idea:
Regular Maintenance:
- Every 3-6 months: Schedule routine testing, especially during peak usage seasons, to catch any early decline in performance before it impacts your enjoyment.
- Before and after storage: If you plan to store your cart for an extended period, test the batteries before storing them and again upon taking them out for optimal performance.
Performance Concerns:
- Notice any of the “Signs of Failing Golf Cart Batteries” mentioned earlier? Don’t wait for complete failure, test the batteries to confirm the issue and determine the best course of action.
- A sudden decrease in range or acceleration: Even without other obvious signs, a notable drop in performance warrants testing to identify the cause, which could be battery-related.
Pre-purchase Check:
- Buying a used golf cart? Testing the batteries is crucial to assess their overall health and avoid inheriting potential problems from the previous owner.
Additional Factors:
- Extreme weather conditions: If your cart has been exposed to extreme heat or cold, testing can ensure the batteries haven’t suffered any damage.
- Electrical modifications: Any modifications to your cart’s electrical system could impact battery performance, so testing is recommended after such changes.
Testing Methods:
- Voltage test: Using a multimeter, measure the voltage of each battery and the entire system to identify any imbalances or significant deviations from recommended levels.
- Load test: This simulates actual usage by putting stress on the batteries and measuring their ability to maintain voltage under a load. Load testers offer a more comprehensive assessment than just voltage checks.
By proactively testing your golf cart batteries, you can:
- Extend their lifespan: Early detection of issues allows for timely intervention, such as proper charging or equalization, which can prolong battery life.
- Prevent sudden breakdowns: Knowing your batteries’ condition lets you plan ahead and avoid getting stranded on the course.
- Maintain optimal performance: Healthy batteries ensure your cart runs smoothly and deliver the power you need for a fun and enjoyable ride.
Remember, taking care of your golf cart batteries is an investment that pays off in reliable performance and enjoyable experiences. Make testing a regular part of your maintenance routine and enjoy worry-free rides on your trusty cart!
Step-by-Step Guide to Testing Golf Cart Batteries
In this detailed guide, we’ll walk you through the process of testing your golf cart batteries step by step. From preparing the vehicle for testing to interpreting the multimeter readings, you’ll gain valuable insights into ensuring accurate results.
Interpreting Test Results
Understanding what the test results mean is crucial. We’ll explain what different readings indicate, helping you identify healthy batteries from those that may need attention.
Common Issues and Troubleshooting
Addressing specific problems revealed during testing is essential for maintaining optimal performance. Gain insights into common issues and learn practical troubleshooting tips to keep your golf cart running smoothly.
Maintenance Tips for Golf Cart Batteries
Preventive care is key to prolonging the life of your golf cart batteries. Discover cleaning and care techniques, along with storage recommendations to ensure your batteries remain in top condition.
Benefits of Regular Battery Testing
Regular battery testing goes beyond just avoiding sudden breakdowns. Explore the benefits, including enhanced performance, cost savings, and prolonged battery life.
DIY vs. Professional Testing
Weigh the pros and cons of DIY testing versus seeking professional assistance. Understand when it’s appropriate to handle testing on your own and when professional expertise may be necessary.
Conclusion
In conclusion, the regular testing of your golf cart batteries emerges as a fundamental and indispensable aspect of responsible ownership. Delving into the intricacies of “How to Test Golf Cart Batteries” not only enhances your understanding of the underlying processes but also empowers you to interpret the results effectively. This proactive approach, fueled by insights gained through testing, becomes the cornerstone for ensuring that your golf cart retains its status as a reliable and efficient mode of transportation.
(FAQs)
1. Q: Why is it important to test golf cart batteries?
- A: Regular battery testing helps ensure optimal performance and longevity of your golf cart. It allows you to identify issues early on and prevent unexpected breakdowns on the course.
2. Q: How often should I test my golf cart batteries?
- A: It is recommended to test your golf cart batteries at least once a month, especially during the peak golf season. This helps in detecting potential problems and ensures your batteries are in good condition.
3. Q: What tools do I need to test golf cart batteries?
- A: Commonly used tools include a voltmeter or multimeter, a hydrometer for flooded lead-acid batteries, and a battery load tester. These tools help measure voltage, specific gravity, and overall battery health.
4. Q: How do I test the voltage of my golf cart batteries?
- A: Use a voltmeter or multimeter to measure the voltage of each battery individually. A fully charged 12-volt battery should read around 12.6 volts. Lower readings may indicate a need for charging or battery replacement.
5. Q: Can I test the specific gravity of my batteries without a hydrometer?
- A: No, a hydrometer is essential for measuring the specific gravity of electrolytes in flooded lead-acid batteries. Specific gravity provides insights into the state of charge and the overall health of the battery.
6. Q: What does it mean if my batteries show uneven voltage readings?
- A: Uneven voltage readings could indicate imbalances in the charging or discharging of individual batteries. It may suggest a problem with the battery itself or the charging system.